1.2 多版本环境管理
本文主要2个内容:
- virtualenv创建多个虚拟环境
- pyenv管理多个python版本
为什么需要多个版本管理?
Imagine you have an application that needs version 1 of LibFoo, but another application requires version 2. How can you use both these applications? If you install everything into
/usr/lib/python2.7/site-packages(or whatever your platform’s standard location is), it’s easy to end up in a situation where you unintentionally upgrade an application that shouldn’t be upgraded.
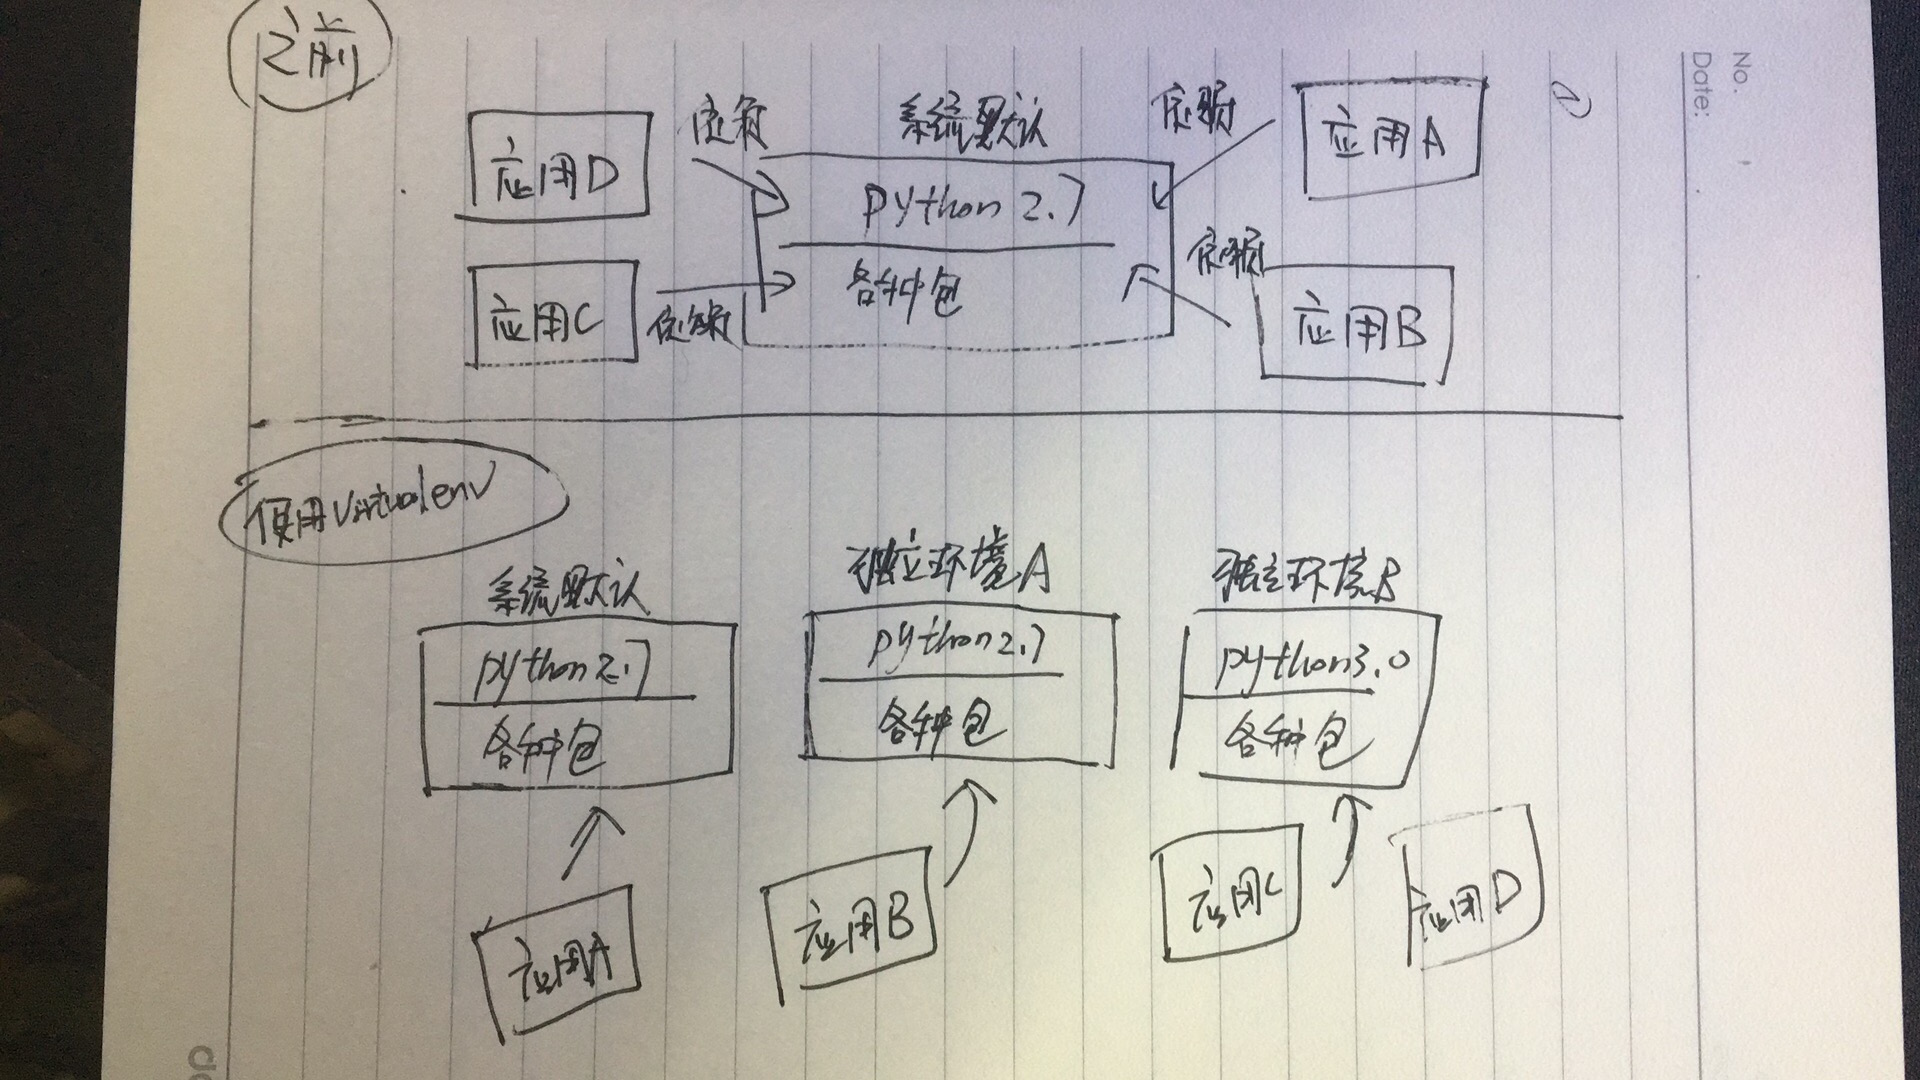
这是引用于virtualenv官方文档中的一段话,意思是假设这样一种情况,你使用系统自带的Python,例如2.7.1,但是你写了2套程序A和B,A基于python2.7.1,B需要基于python3.5.0,如果只有一个默认的环境,那么B程序将无法运行。如果将系统自带环境更新为3.5.0,那么A程序又跑不动了。
有比如,程序同样是基于2.7.1,但是调用的第三方包版本不同,例如A程序是需要某个第三方包v1.5版本,B则是需要v2.0版以上,这样又是鱼和熊掌不可兼得的情况。
因此有了多个独立虚拟环境的需求。
使用Virtualenv满足多版本需求
Virtualenv是一个便利的Python多版本管理工具,如图,使用Virtualenv的目的就是为了独立出多个环境出来,让多个应用都可以有属于自己的环境,不影响其他环境。

如何安装Virtualenv?
1、通过pip方式安装
$ [sudo] pip install virtualenv # 权限问题则需要sudo
2、手工通过脚本安装
$ curl -O https://pypi.python.org/packages/source/v/virtualenv/virtualenv-XXtar.gz
$ tar xvfz virtualenv-XXtar.gz
$ cd virtualenv-XX
$ [sudo] python setup.py install
安装之后,在终端输入virtualenv能显示内容说明安装成功。
virtualenv如何使用?
使用基本流程:
1、创建新的虚拟环境
2、激活环境,然是使用环境
3、退出环境
举个例子,我们虚拟3个环境出来,,然后分别进入运行python。
# 1、创3个虚拟环境

iMac:test yanggan$ virtualenv  env1  # 使用vritualenv env(环境名,文件夹名) 之后,会在当前目录下创建一个文件夹,文件夹就是新的python环境
New python executable in /Users/yanggan/Desktop/test/env1/bin/python
Installing setuptools, pip, wheel...done. # 为了方便,会自动带了pip工具,便于在新环境下载第三方模块

Mac:test yanggan$ virtualenv  env2 # 创建第二个环境
New python executable in /Users/yanggan/Desktop/test/env2/bin/python
Installing setuptools, pip, wheel...done.

iMac:test yanggan$ virtualenv --system-site-packages  env3 # 创建第三个环境,使用--system-site-packages,让这个虚拟环境可以访问系统内置的第三方包目录
New python executable in /Users/yanggan/Desktop/test/env3/bin/python
Installing setuptools, pip, wheel...done.

# 2、激活环境、在环境中使用pip和退出环境

iMac:test yanggan$ ls # 目前使用创建了几个文件夹,就是3个环境
env1    env2    env3
iMac:test yanggan$ source env1/bin/activate  # 激活环境env1,现在当前终端的python环境就是这个。
iMac:test yanggan$ pip list # 系统(env1)表示提醒当前环境为env1,我们通过pip查看env1环境的自带第三方包内容

## pip list其实就是env1/lib/python2.7/site-packages路径里面的第三方模块

PRECATION: The default format will switch to columns in the future. You can use --format=(legacy|columns) (or define a format=(legacy|columns) in your pip.conf under the [list] section) to disable this warning.
pip (9.0.1)
setuptools (28.8.0)
wheel (0.29.0)

(env1) iMac:test yanggan$ deactivate  # 退出env1环境命令

iMac:test yanggan$ source env3/bin/activate # 激活环境env3
(env3) iMac:test yanggan$ pip list # 环境3的第三方包是直接读取默认系统路径位置的包
DEPRECATION: The default format will switch to columns in the future. You can use --format=(legacy|columns) (or define a format=(legacy|columns) in your pip.conf under the [list] section) to disable this warning.
altgraph (0.10.2)
bdist-mpkg (0.5.0)
bonjour-py (0.3)
chardet (3.0.4)
macholib (1.5.1)
matplotlib (1.3.1)
modulegraph (0.10.4)
numpy (1.8.0rc1)
olefile (0.44)
(env3) iMac:test yanggan$ deactivate # 退出当前环境

发现了么,其实virtualenv就是把某个版本python(例如系统自带的2.7)copy出来,放在独立的文件夹路径中管理,达到多个环境之间相互不影响。
还缺点什么东西?
在使用virtualenv虚拟环境时候,发现了默认情况下virtualenv使用你系统全局的python版本来创建新的环境目录,例如我在os下使用的是默认python 2.7.1,则env1,env2,env3都是python。那么,如何做到在再新建一个指定版本(例如3.5)的python环境呢?
使用Pyenv做多个版本管理
- Pyenv能干嘛?pyenv是一个python版本管理工具,能在一个系统中,共存和管理多个python版本,并可以使用指定的环境。
- 如何安装pyenv? https://github.com/pyenv/pyenv
在终端使用pyenv
# 查看当前已有的python版本
iMac:test yanggan$ pyenv versions # 当前我系统有2个版本,一个是system默认的,另外一个2.7.8新的已安装的
 system (set by /Users/yanggan/.pyenv/version)
  2.7.8
# 安装新的版本,例如安装3.6.0版本
iMac:test yanggan$ pyenv install --list # 列出所有可以安装的版本
Available versions:
  2.1.3
  2.2.3
  2.3.7
  2.4
  2.4.1
  2.4.2
  2.4.3
  2.4.4
  2.4.5
  2.4.6
  ......
iMac:test yanggan$ pyenv install 3.6.0 # 安装指定3.6.0版本的python,静静等待,反过来可以 pyenv uninstall 卸载。
Downloading Python-3.6.0.tar.xz...
-> https://www.python.org/ftp/python/3.6.0/Python-3.6.0.tar.xz
iMac:test yanggan$ pyenv rehash # 更新或者新增版本后,执行这个命令,当做更新快捷方式,必须操作


# 切换到指定版本,例如切换到3.5.0版本,然后在利用virtualenv创建3.5.0的环境

1、在终端切换到我们需要部署环境的路径,用pyenv切换版本

iMac:test yanggan$ mkdir test2 # 创建文件夹
iMac:test yanggan$ cd test2/ # 进去
iMac:test2 yanggan$ pyenv local 3.5.0 # 把test2当前文件夹底下的python环境设置为python3.5.0

    # pyenv有3个命令来切换环境,pyenv global 、pyenv local 、 pyenv shell
    # 优先级 shell > local > global
    # global指定系统全局版本,例如切换为3.5.0则系统默认环境则为3.5.0,不建议那么做
    # local是指定当前文件夹底下的环境为某版本,这个最好
    # shell 是当前终端环境为某个python版本
iMac:test2 yanggan$ python -V # 当前路径test2底下的版本为3.5.0
Python 3.5.0
iMac:test2 yanggan$ cd .. # 返回上一个路径
iMac:Desktop yanggan$ python -V # 查看这个路径版本,并没有python local 设置当前路径版本,所以是系统默认版本
Python 2.7.10

iMac:test2 yanggan$ pip install virtualenv # 有可能3.5.0的版本没有pip这个工具,因为这个环境文件路径是pyenv自己,所以要安装一下
iMac:test2 yanggan$ tree -L 2 env3.5/ # 可以看到已经创建好了一个3.5.0的python环境
env3.5/
├── bin
│   ├── activate
│   ├── activate.csh
│   ├── activate.fish
│   ├── activate_this.py
│   ├── easy_install
│   ├── easy_install-3.5
│   ├── pip
│   ├── pip3
│   ├── pip3.5
│   ├── python -> python3.5
│   ├── python-config
│   ├── python3 -> python3.5
│   ├── python3.5
│   └── wheel
├── include
│   └── python3.5m -> /Users/yanggan/.pyenv/versions/3.5.0/include/python3.5m
└── lib
    └── python3.5
好,就到这里了。